In January in Chicago, a typical unheated garage floor sits around 35–40°F. Standard epoxy needs 50°F at minimum — 60°F to be safe. That 15–20 degree gap isn’t a minor inconvenience. It’s the difference between a coating that bonds properly and one that stays soft, sticky, and delaminating within months.
But winter installs aren’t impossible. They’re just more demanding. If you need your garage floor done in December or February — maybe you’re prepping to sell in spring, maybe it finally cracked and you can’t wait — here’s exactly what’s required to do it right.
Why Cold Temperatures Hurt Epoxy
Epoxy curing is an exothermic chemical reaction: the resin and hardener combine and generate heat as they polymerize. Cold temperatures slow this reaction dramatically. Below 50°F, the chemical cross-linking that gives epoxy its hardness and adhesion may stall completely — leaving a film that looks coated but has almost no mechanical strength.
Specifically, what happens in cold conditions:
- Slower pot life isn’t actually the problem here (pot life extends in cold — it’s the cure that suffers)
- Incomplete cure means the floor never reaches full hardness
- Poor adhesion as the epoxy can’t properly wet the concrete surface
- Amine blush — a phenomenon where moisture reacts with the hardener at the surface, creating a waxy, non-stick film that prevents topcoat adhesion
The Temperature Requirements, Plainly Stated
Most standard two-part epoxy products specify:
- Minimum ambient temperature: 50°F
- Minimum substrate (concrete) temperature: 50°F
- Minimum recommended for reliable results: 60°F
- Surface temp must be at least 5°F above the dew point
These aren’t conservative recommendations from overly cautious manufacturers. They’re the threshold below which product performance becomes genuinely unpredictable. Your contractor’s guarantee also almost certainly voids at sub-minimum temperatures.
The concrete surface itself is often 5–10°F colder than the air temperature in a cold garage — so even if the thermometer reads 55°F air temp, the slab may be at 46°F. Always measure the substrate directly with an infrared thermometer.
Heating the Space: How It’s Done
The standard approach to winter epoxy installation is to heat the garage to bring both air and slab temperatures up to the working range, then maintain that temperature throughout the application and full cure period.
Portable propane heaters: These are the most common tool. A contractor-grade forced-air propane heater can bring a two-car garage from 35°F to 65°F in 2–3 hours. The catch: propane combustion produces water vapor, which adds humidity to the space. You may need to run a dehumidifier alongside to keep humidity in check.
Electric construction heaters: Cleaner option — no combustion humidity — but typically less output. Good for maintaining temperature once the space is warmed up, less effective for initial heating of a very cold space.
Radiant heaters: Some contractors use radiant (infrared) heaters pointed directly at the slab to warm the concrete itself. Concrete holds cold well; surface temperature lags behind air temperature significantly. Radiant heating can accelerate slab warm-up.
The heat must stay on throughout the full initial cure period — typically 24–72 hours for standard epoxy. If the space drops below 50°F during cure, you risk the reaction stalling mid-way through, which can leave a permanently compromised coating.
| Heating Method | Pros | Cons |
|---|---|---|
| Propane forced-air heater | Fast, powerful | Adds humidity from combustion |
| Electric construction heater | No humidity addition | Slower, less output |
| Radiant (infrared) heater | Directly warms slab | Expensive to rent, slow |
| Combination (heater + dehumidifier) | Best overall control | More equipment, more cost |
Extended Cure Times in Cold Weather
Even when temperature minimums are met, cold slows everything down. A standard epoxy coat that would be ready for foot traffic in 12–16 hours at 70°F may need 24–36 hours at 55°F. A top coat that’s normally recoatable in 8 hours may need 16.
This has practical consequences:
- You can’t park cars back in the garage until the full cure is complete (typically 72 hours for standard epoxy, longer in cold conditions)
- Multi-coat systems require longer waits between coats
- The heating must stay on consistently — temperature spikes and drops during cure create stress in the partially-cured film
Your contractor should be explicit about what the cure schedule will look like given the expected temperatures. “Ready in 24 hours” is a summer number. Ask for the winter number.
Polyaspartic: The Cold-Weather Advantage
Polyaspartic coatings are a game-changer for cold-weather installations. Where standard epoxy needs 50°F minimum, some polyaspartic formulations can be applied at temperatures as low as 25°F. They cure faster at any temperature, and their cold-weather performance is significantly more consistent than epoxy.
The tradeoff is cost — polyaspartic systems typically run $0.50–$1.50/sq ft more than equivalent epoxy systems — and the much shorter pot life (often 20–30 minutes vs. 45–60 for epoxy). Contractors who work with polyaspartic in cold weather need to move fast and have their prep completely dialed in before the clock starts.
If you’re in Minnesota, Wisconsin, Montana, or upstate New York and need a floor done in October, November, or March, polyaspartic is worth the conversation with any contractor you’re getting quotes from. See our full epoxy vs. polyaspartic comparison for the detailed breakdown.
Delay the project if:
- You can’t maintain substrate temp above 50°F for at least 72 hours continuously
- Outdoor temps are forecast to drop below 20°F (hard to hold heat in an attached garage)
- The concrete has recently thawed and may still have moisture migration from freeze-thaw cycles
- Your contractor isn’t able to provide polyaspartic as an alternative and won’t use heating equipment
What a Winter Install Actually Costs More
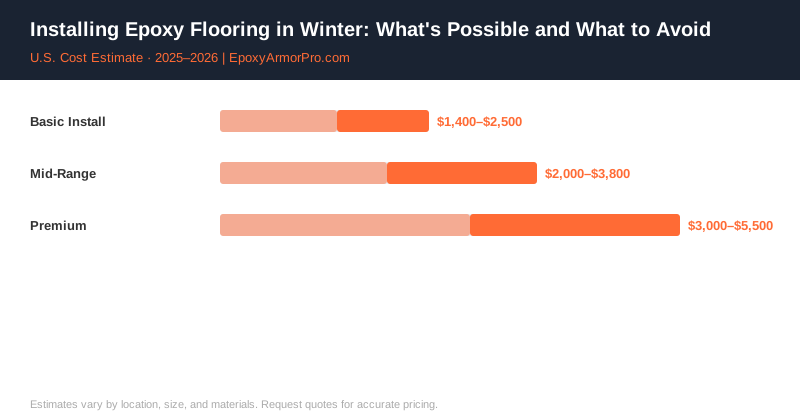
The additional work required for cold-weather installation has a cost. Expect to pay:
| Winter Installation Add-On | Typical Cost |
|---|---|
| Heater rental (3-day project) | $150–$300 |
| Contractor labor premium for winter scheduling | +10–20% over summer rates |
| Dehumidifier rental if needed | $75–$150 |
| Extended cure monitoring (contractor return visit) | $75–$200 |
| Amine blush grinding if discovered | $0.75–$1.50/sq ft added labor |
For baseline cost context, our garage epoxy flooring guide has national average pricing.
The Honest Bottom Line
If you can wait until spring, wait. A May install is easier, more predictable, and cheaper than a January install in most of the northern US. The floor will thank you.
If you genuinely can’t wait — prepping a house for sale, a concrete surface that needs protection before another winter, a renovation with a fixed timeline — a winter install is absolutely doable. It just requires the right contractor, the right products (polyaspartic for cold-weather tolerance), and the discipline to maintain proper temperatures for the full cure window.
Don’t let a contractor cut corners on heating because “it’ll probably be fine.” It probably won’t.
Contractor Referral Disclaimer: EpoxyArmorPro is a contractor referral and cost information service, not a licensed flooring contractor. We connect consumers with independent, licensed, and insured contractors. We do not perform any flooring work directly. Cost estimates are averages based on market data and vary by location, project size, materials, and contractor. Always verify contractor licensing and insurance before hiring. Individual quotes may differ from estimates shown.