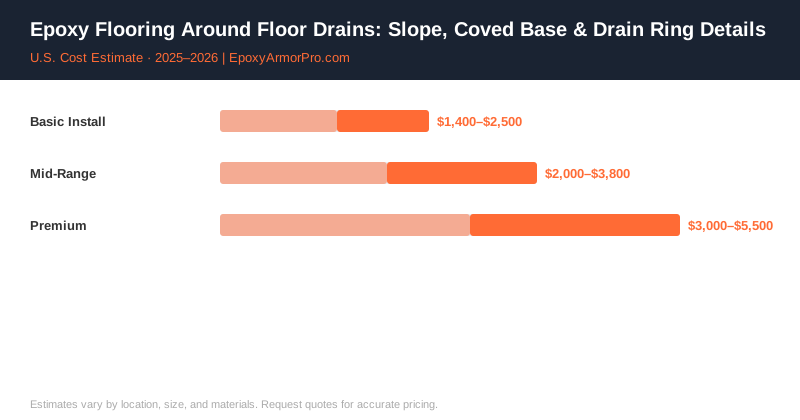
42% of garages with floor drains end up with epoxy delamination within 3 feet of the drain. Not because the epoxy failed — because nobody thought carefully about the termination detail before the coating went down.
Drains are transition points. They’re where water pools, where concrete edges are most vulnerable, and where the coating has to make the hardest geometric move. Get this wrong and you’ve created a failure point that will spread outward over time.
Why Drains Are the Problem Spot
Water finds the path of least resistance. On a flat or poorly sloped epoxy floor, that path runs to any low point — including around and under the drain rim. If the coating doesn’t terminate cleanly at the drain edge, water seeps underneath the epoxy and breaks the bond between the coating and concrete.
Freeze-thaw cycling makes this worse. Water trapped under coating at a drain ring expands when it freezes, popping the epoxy loose in a ring pattern. You’ve seen this: delamination that looks like a bullseye centered on the drain.
The fix isn’t complicated. It just requires thinking it through before the coating goes down, not after.
Slope Requirements
The International Building Code (IBC) and most local plumbing codes require a minimum floor slope of 1/8 inch per foot toward floor drains in commercial spaces. For residential garages, there’s no universal code requirement — but 1/8 to 1/4 inch per foot toward the drain is considered best practice.
Most concrete garage slabs are poured with some slope toward the door or a drain, but “some slope” and “correct slope” are different things. Before any epoxy goes down, your contractor should check actual slope with a level or slope gauge.
If the slab is flat or sloped away from the drain (more common than you’d think in older construction), you have two options:
Option 1: Self-leveling underlayment pour. A cementitious self-leveling compound is poured to build up the low areas and create a consistent slope toward the drain. This adds $1.50–$3.00/sq ft to the project cost for the affected area.
Option 2: Resurfacer skim coat. A polymer-modified concrete resurfacer can be feathered to create slope. Less expensive for small corrections, but the feathered edge needs to be ground flush so the epoxy doesn’t bridge an air gap.
The Drain Ring Termination Detail
This is the detail most contractors handle poorly. When epoxy reaches the drain, it has to stop somewhere clean. The three approaches, from worst to best:
Just stop at the drain rim: The epoxy runs up to the cast iron or ABS ring and stops with a ragged edge. Over time, foot traffic and thermal expansion break that edge, and delamination starts. This is what happens on $0.99/sq ft “competitive” jobs.
Tape and terminate: The drain ring is masked with foam backer rod, the epoxy is feathered to a thin edge at the ring, and the gap is sealed with a flexible polyurethane sealant (Sikaflex, Tremco Dymeric, etc.) after the epoxy cures. This is the correct residential standard. The flexible sealant accommodates movement without cracking.
Drain ring replacement: Before coating, the existing drain rim is removed and a new adjustable drain ring (Josam, Wade, or Zurn) is set at finished floor height. The epoxy runs under the ring flange, which then clamps down over it. No exposed edge, no gap to seal. This is the commercial standard and adds $150–$300 per drain.
The gap between the epoxy edge and the drain ring must be filled with a flexible sealant — not caulk, not additional epoxy. Rigid sealants crack under thermal movement.
Spec a polyurethane or polysulfide sealant rated for:
- Water immersion
- Chemical resistance (for garages: oil, gasoline, road salt)
- Shore A hardness 20–35 (soft enough to flex)
Products that meet this: Sikaflex-1a, Tremco Dymeric 511, Bostik Chem-Calk 900. Avoid silicone — it doesn’t bond well to epoxy and can’t be painted or recoated.
Coved Base Details
A coved base (sometimes called a “sanitary cove” or “flash cove”) is where the floor coating is turned up the wall a few inches to form a curved transition. Instead of a 90-degree corner where water, grime, and mop heads collect, you get a smooth radius that’s easy to clean and fully waterproof.
Coved bases are mandatory in commercial kitchens, food processing, pharmaceutical manufacturing, and any space with wet operations. In residential garages, they’re optional — but they look finished and they seal the concrete-wall junction against moisture infiltration.
The installation process:
- A pre-formed coving strip (PVC or aluminum) is adhered to the wall at the floor-wall junction before the epoxy is applied
- A body coat of epoxy is troweled over the cove form to build up the radius
- The floor epoxy is applied continuously from the cove radius onto the floor
- The topcoat seals the entire assembly
Standard coved base height is 4 inches. You can go up to 6 or even 8 inches in wetter applications. The radius at the floor-wall junction should be at least 3/4 inch to prevent stress cracking.
| Drainage Detail | Added Cost | Best For |
|---|---|---|
| Tape-and-seal at drain ring | $50–$100 per drain | Residential garage, standard |
| Adjustable drain ring replacement | $150–$300 per drain | Commercial, wet areas, long-term investment |
| Slope correction (self-leveling pour) | $1.50–$3.00/sq ft (affected area) | Flat slabs, older construction |
| Coved base (4 in.) | $8–$15 per linear foot | Commercial kitchens, laundry rooms, wet garages |
French Drain Integration
A French drain — a gravel-filled trench with a perforated pipe — is sometimes used in garages that deal with groundwater intrusion rather than surface drainage. If you’re in this situation, the approach is different from a standard floor drain.
The perforated pipe needs to discharge somewhere, and the trench cover needs to be flush with the finished floor. Options:
Cast-in-place trench drain: A metal trench drain (ACO, Jay R. Smith, or Watts) with a removable grate is set flush to the slab. The epoxy terminates at the trench drain frame, sealed with flexible sealant. This is the cleanest solution. Cost: $200–$500 per linear foot installed.
Covered trench with paver grate: Lower cost option where the trench is covered with steel bar grating and the epoxy runs to the edge of the grating frame. Works, but the grating needs to be removable for cleaning and grate edges are harder to seal cleanly.
Whatever the drainage approach, the principle is the same: the epoxy coating must terminate at a fixed, cleanable edge. No ragged cuts, no coating that bridges a gap.
What to Ask Before the Job Starts
Three specific questions your contractor should answer before the first coat goes down:
“How are you handling the drain ring termination?” If the answer is anything other than “tape-mask and seal with flexible sealant” or “replace the drain ring,” push back.
“What’s the slope at the drain, and is it adequate?” They should actually check this before coating, not assume.
“Are you coring the drain opening for height adjustment?” If you’re adding thickness with epoxy, the drain ring needs to be set up accordingly so it doesn’t end up below finished floor level — which creates a pooling lip.
A contractor who hasn’t thought through these details will hand you a delamination problem in 18 months. The time to sort this out is before the coating.
Contractor Referral Disclaimer: EpoxyArmorPro is a contractor referral and cost information service, not a licensed flooring contractor. We connect consumers with independent, licensed, and insured contractors. We do not perform any flooring work directly. Cost estimates are averages based on market data and vary by location, project size, materials, and contractor. Always verify contractor licensing and insurance before hiring. Individual quotes may differ from estimates shown.