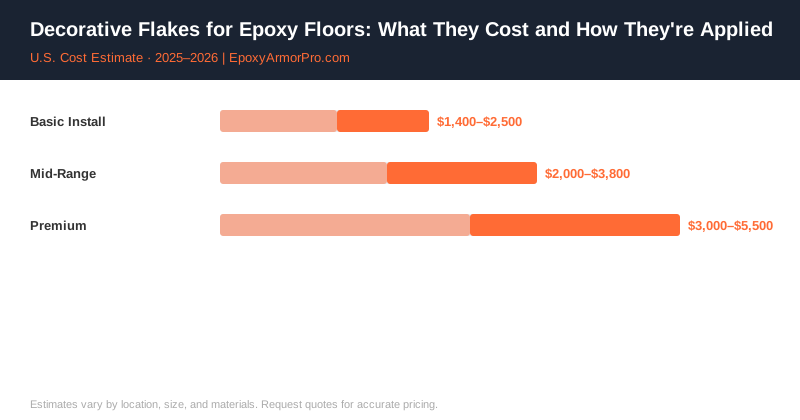
42% of residential epoxy flooring installs in the US include decorative vinyl flakes — and that number’s been climbing every year. It’s not hard to understand why once you see a full-broadcast flake floor: it looks expensive, hides minor concrete imperfections, and adds real slip resistance. What’s not obvious is how the technique works and what it actually adds to the job cost.
What Vinyl Flakes Are (and Aren’t)
Decorative vinyl flakes — also called color chips or broadcast chips — are thin, irregularly shaped pieces of painted vinyl, typically 1/4 inch across. They’re made from plasticized vinyl that bonds to wet epoxy, becoming permanently embedded in the cured film.
They’re not:
- Gravel or aggregate (they’re too light and thin for structural load-bearing)
- A separate coating layer
- Optional decoration that can be removed later
Once cured and topcoated, the flakes are a permanent part of the floor system — mechanically locked between the base coat epoxy and the clear topcoat applied over them.
Standard flake sizes are 1/16", 1/8", 1/4", and 1/2" (also called “maxi flakes”). The 1/4" size is most common for residential garages. Larger flakes create a more dramatic texture; smaller flakes create a finer, more uniform appearance.
Full Broadcast vs. Partial Broadcast
How many flakes you throw, and how you throw them, determines the entire look.
Full broadcast (saturated coverage) means throwing flakes at the wet base coat until the epoxy is completely saturated — it won’t accept any more chips. You’ll go through 1/4 to 1/2 pound of flakes per square foot. The base coat color becomes completely hidden. The finished floor has a consistent, heavily textured look similar to terrazzo. This is the most popular residential garage finish.
Partial broadcast (scattered coverage) means a lighter, controlled scatter — 1/16 to 1/8 lb per square foot. The base coat color stays visible between the flakes, creating a speckled effect. More subtle visually, but still provides the anti-slip benefit of the texture.
Defined pattern broadcasting uses multiple flake colors applied in patterns or zones — like a different color near the edges. More complex, more expensive, more custom.
The Application Technique
Broadcasting flakes looks easy in videos. There’s more to it than the wrist motion:
- Base coat goes down first by squeegee and back-roller, exactly as in a standard epoxy install.
- Flakes are broadcast immediately — while the applicator at the back rolls, the other crew member throws handfuls of flakes from a bucket, walking backward across the floor.
- Throw height matters — releasing flakes from 4–5 feet up creates more even distribution than throwing from waist height. The flakes need time to separate and float down individually, not fall in clumps.
- Coverage is verified — for full broadcast, the installer visually confirms there’s no visible base coat showing before moving to the next section.
- Cure — the base coat cures with the flakes embedded. Typically 8–16 hours before the next step.
- Scrape — a long-handled floor scraper knocks down any flake edges sticking up. This step prevents rough texture in the finished floor and ensures the topcoat lays flat.
- Topcoat — one or two clear coats seal the flakes permanently.
Why Flakes Add Genuine Slip Resistance
Smooth epoxy is slippery when wet — more so than bare concrete in many cases. The ASTM E303 pendulum slip resistance test shows smooth epoxy surfaces typically score 40–50 (moderate risk) under wet conditions. Full-broadcast flake floors with clear topcoat score 65–75 or higher — well into the “safe” range.
The mechanism is physical texture. The embedded flake edges create micro-ridges across the surface, maintaining contact with shoe soles even when water is present. This matters enormously in garages where cars drip water, in workshops, and in basements that see wet foot traffic.
For commercial applications, slip resistance is often a code requirement. Many commercial epoxy specs require a minimum coefficient of friction of 0.5 wet — achievable with full-broadcast flake systems but not with smooth epoxy alone.
Cost: What Flakes Add to a Job
Flakes themselves are inexpensive raw material — typically $1.50–$3.00 per pound in bulk. For a 500-sq-ft garage at 1/4 lb per sq ft full broadcast, you need about 125 lbs of flakes — roughly $200–$375 in material.
But the cost question isn’t just materials. Adding flakes extends installation time (scraping step, additional topcoat layer for texture protection) and requires more topcoat material to properly encapsulate the textured surface.
| Flake Option | Added Cost per Sq Ft | Total Impact on Job |
|---|---|---|
| No flakes (smooth solid color) | — | Baseline |
| Partial broadcast (scattered) | +$0.30–$0.60 | +$150–$300 on 500 sq ft |
| Full broadcast (saturated) | +$0.50–$1.00 | +$250–$500 on 500 sq ft |
| Full broadcast + extra topcoat | +$0.75–$1.25 | +$375–$625 on 500 sq ft |
| Custom multi-color blend | +$1.00–$2.00 | +$500–$1,000 on 500 sq ft |
For context, a standard professional epoxy installation on a 500-sq-ft garage runs $1,500–$3,500 without flakes. Adding full-broadcast flakes typically bumps the total $300–$600, or about 10–20% of the base job cost. Most homeowners consider that a reasonable premium for the slip resistance benefit and improved appearance.
Color and Design Options
Standard flake blends from major manufacturers (ArmorChip, Sherwin-Williams, Rust-Oleum Professional) include:
- Classic blend: Grey, black, white, and tan in equal proportions — the most popular residential mix
- Earth blend: Brown, beige, tan, and white — warmer, natural look
- Commercial blend: Heavier grey and black, subtle and professional
- Custom blends: Mix-and-match any colors to match your color coat or design preference
Flakes are available in solid colors, two-tones, and metallic finishes. Metallic flakes in a metallic epoxy base coat layer create a particularly dramatic result — see our metallic epoxy guide if that’s the direction you’re considering.
Getting the Full Picture
Flakes are one piece of the complete epoxy system. For cost factors on the overall job, see our garage epoxy cost guide and DIY vs professional comparison. For the full installation timeline including where flakes fit in, see our installation process guide.
Contractor Referral Disclaimer: EpoxyArmorPro is a contractor referral and cost information service, not a licensed flooring contractor. We connect consumers with independent, licensed, and insured contractors. We do not perform any flooring work directly. Cost estimates are averages based on market data and vary by location, project size, materials, and contractor. Always verify contractor licensing and insurance before hiring. Individual quotes may differ from estimates shown.